Hermle Keywound Wall Clock with Chime Instructions
Posted on November 15, 2018 | By clockde
Hermle Wall Clocks with Keywound 4/4 Westminster Chime Instructions
1) Unpack the clock
Take the clock, the pendulum, and key carefully out of the large carton. Unpack the weights from the smaller carton.
2) Hanging the clock
Hang up the clock so that it is vertical. The best hanger is a wood screw angled upward and screwed into a stud in the wall.
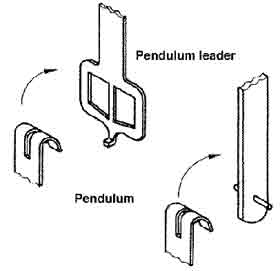
3) Attaching the pendulum
Hang the pendulum onto the pendulum leader (see illustration).
4) Starting the pendulum
Move the pendulum slightly to the left or right and release it gently. You should hear an even “tic – toc” sound. If the tic-toc is uneven or the clock stops, follow the “putting in beat” procedure in step 8.
5) Putting the clock in beat
Putting the clock in beat is the responsibility of the clock owner. While the clock was in beat when it left the factory, it may get out of beat during handling. It is a simple process, once you have tried it a few times. Putting the clock in beat is an adjustment to make the tic and toc evenly spaced. There is a slip clutch mechanism in the clock’s escapement (the part that makes the ticking sound and operates the pendulum). The slip clutch is operated by pushing the pendulum leader (see illustration 2) slightly past the point where you feel a resistance. To put the clock in beat: Make sure the clock is hanging straight. Listen to the tic toc. Gently push the pendulum leader slightly past the point of resistance. Listen to the tic toc again. If it is more uneven, push the leader in the opposite direction and listen to the tic tock again. After several tries, you will be able to get the tic and toc sound to be evenly spaced, and the clock is then “in beat”. (If the clock does not tick at all, remove the pendulum, and first do the above procedure with the pendulum off. This will get the beat set approximately correct. Then put the pendulum on.)
6) Chime
Your clock chimes the Westminster melody every 15 minutes (see illustration 4). Following the hour chime, it will strike the number of the hour.
7) Chime shut-off
The chime shut-off lever is located beside the number 9 on the dial.
Lever up = silent
Lever down = chime
8) Setting the clock
The minute hand (long hand) may be moved clockwise or counterclockwise to set the clock to the correct time IF the chimes are turned off. Never turn the hour (short) hand, it moves automatically. After two hours the chimes will be automatically synchronized.
You may set the time clockwise with the minute hand with chimes on IF you stop at each quarter hour and let the chime complete.
If the clock is striking the wrong hour, move the hour hand (short hand) to point to the hour that the clock just struck.
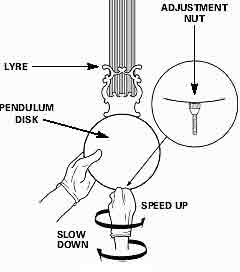
*9) Regulating the clock
To make the clock run slower – turn the regulating nut below the pendulum to the left (see illustration below).
To make the clock run faster – turn the regulating nut to the right.
One turn of the regulating nut changes the clock’s rate by approximately 1 minute per day. An accuracy of 1 – 2 minutes per week is typical.
*speed UP ——slow DOWN
10) Winding the clock
Please wind your clock fully every 7 days for optimum performance (the clock will actually run about 8 days on one winding). To wind the clock, use the enclosed key. Turn key clockwise until it stops (about 3 1/2 turns on the left winder and about 4 1/2 turns on the right winder. Wind the center winder until the weights are at the top. Wind the clock gently so the weights do not suddenly reach the stopping point at the top. (The center winder is for the timekeeping, the right winder is for the quarter-hour chime, and the left winder is for the hour strike.)
ADJUSTING THE CHIME
HAMMERS The hammers were adjusted at the factory and should be in the proper location, If however, you find that they moved during shipping you can adjust without difficulty. On clocks with chimes rods, the chime hammers are made of brass and can be easily bent without harm. Adjust them so that they do not interfere with each other when moving. The hammers should strike the chime rod squarely in the center and should rest 3mm (1/8) away from the chime rods when not striking.
CARE AND MAINTENANCE Your clock requires very little attention. There are a few things that you need and can do to increase its life.
- Wind your clock every seven or eight days.
- Wax and polish your clock cabinet as frequently as you do your other fine furniture. Any good non-silicone furniture polish or paste wax will do. Dust often.
- Clean the movement every five to ten years depending on climate conditions. Extremely arid or salty air, heat or cold may necessitate more frequent servicing. Desert climate with high heat and low humidity causes oil to dry up. Salt air causes oil to break down. We do not recommend attempting to clean your movement yourself, instead call a reputable clock service center.
Recent Comments