Seiko QHR024SLH Operating Instructions
Posted on December 27, 2017 | By clockde
The RADIO-CONTROLLED Clock
With the Radio-Controlled Clock, you have the most accurate timepiece within the continent. It can receive the time signal transmitted by the National Institute of Standards and Technology (NIST), which is regulated by 3 atomic clocks and deviates less than 1 second within 3,000 years. The NIST broadcasts the time signal (WWVB, 60kHz) continuously from Fort Collins, Colorado. This signal can be received anywhere in the continental USA that long wave (AM) radio reception is possible with a portable radio. it is expected that the signal can reach a distance of 2,000 miles from the transmitter. Therefore, your clock will receive the signal within the broadcast range anywhere an AM signal can be received; generally, the signal cannot be picked up in massive metal and concrete structures unless near a window. In addition, some environmental effects (see below) may affect the transmitting distance.
The Radio-Controlled Clock obtains the accurate time with wireless technology.
Same with all wireless devices, the receiving ability may be affected by, but not limited to, the following conditions:
- Long transmitting distance.
- Nearby mountains and valleys.
- Among tall buildings.
- Near railway, high voltage cable, etc.
- Near freeway, airport, etc.
- Near construction site.
- Inside concrete buildings.
- Near electrical appliances.
- Bad weather.
- Inside moving vehicles.
- Nearby metallic structures.
Specifications
- Receive 60kHz WWVB signal transmitted by NIST in Fort Collins, Colorado.
- Automatic time adjustment after the signal reception.
- Calendar with day-of-the-week display from 1 January 2000 to 31 December 2099
- Hour, Minute and Second display.
- 12 or 24-hour format.
- Crystal oscillator frequency : 32.768kHz.
- Time accuracy (atomic clock): better than 1 second in 3000 years.
- Time accuracy (free run): average within 60 seconds per month.
- Operating temperature from 0°C to 50°C (32°F to 122°F).
Getting Started
As long as batteries are supplying power to the unit, it receives the time signal and will adjust time automatically. No manual adjustment is required after power up. Accurate adjustment of the clock based on the time signal is supported in the continental USA.
You are recommended to leave the clock overnight for searching time signal since night time allows better transmission of the time signal.
Signal Receive Operation
The unit will automatically receive the time signal every day at 2:00 am and make any required adjustment to the time setting.
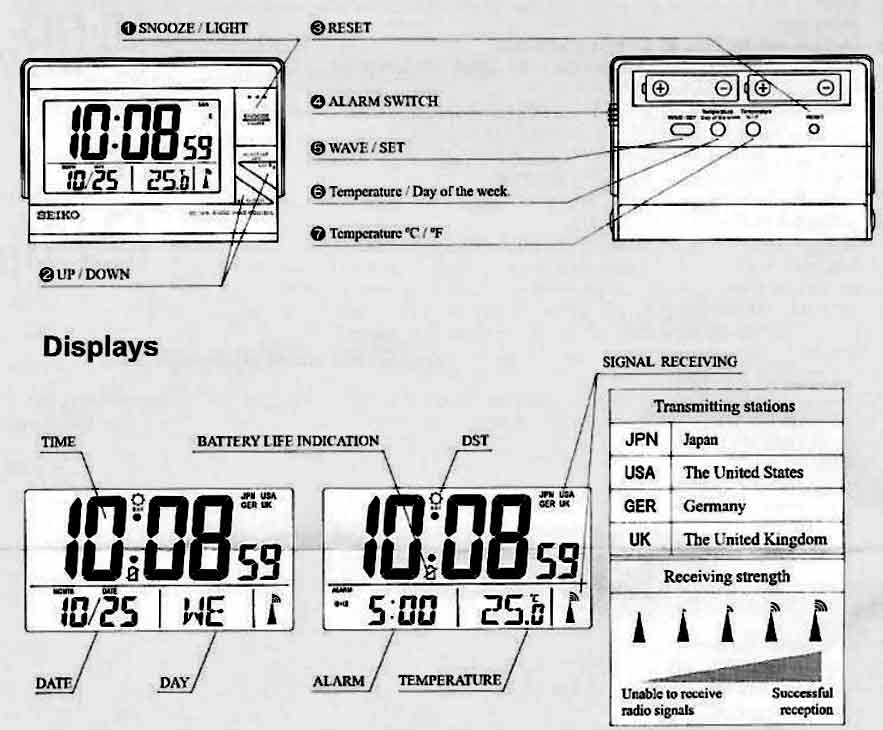
The WAVE OK indicator and the antenna tower icon appear on the display if the time signal is successfully received or after manual pressed WAVE button.
Important: Do not perform any button or switch operation while a signal receive operation is in progress.
Triggering a Receive Operation Manually
You can trigger a signal receive operation at any time by pressing the WAVE button, which causes the unit to perform an immediate signal receive operation.
Unsuccessful Signal Reception
If the automatic update is unsuccessful, the wave on top of the antenna tower and the WAVE icon will disappear and the unit will re-try to receive the signal again every hour afterward for a maximum of 4 hours.
If unsuccessful signal reception after battery installation or after reset, the unit keep trying for 10 minutes every 3 hours until time signal reception successful.
Manually Set the Clock
To Set the DST and TIME ZONE
Press and hold the SET/WAVE button for couple of seconds and Calendar Mode will begin
To Set the Calendar
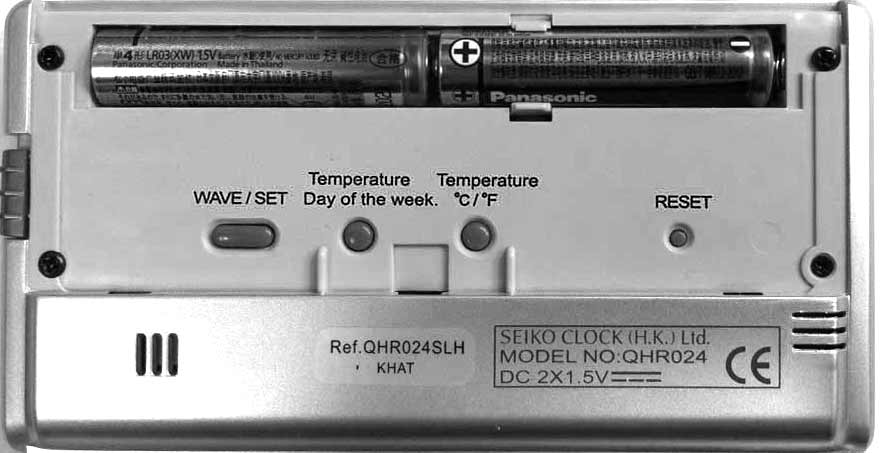
- Press + or — button on the front sequentially to set year.
- Holding down either + or — button on the front change the year at high speed.
- Press SET/WAVE button to confirm year set and goes to date set.
- Press + or — button on the front sequentially to set date.
- Press SET/WAVE button to set the order of the month and year.
- Holding down either + or — button on the front will change the order of the Month and Year.
- Press SET/WAVE button to set the Time
- Holding down either + or — button on the front change the time at high speed (AM or PM will be displayed).
- Press SET/WAVE button to enter DST MODE
The DOWN button toggles between DST ON and OFF
The UP button toggles the time zones as Eastern, Central, Mountain, Pacific, AK-Alaska, HI Hawaii until your desired time zone shown on display.
- Press SET/WAVE button to enter LANGUAGE MODE
Holding down either + or — button change the language to EN (English or your common language).
- Press SET/WAVE button to enter Standard (12 Hour) or Military Time (24Hour) MODE
- Press SET/WAVE button again to END and return to normal screen
To Set the Format
- Press SET/WAVE button and RELEASE to enter FORMAT MODE
- PRESS SET/WAVE AGAIN QUICKLY TO TOGGLE BETWEEN USA, UK, JPN, GER, …then it will display your time zone (you cannot change your time zone from this step).
- WHILE IN THIS MODE Temperature / Day of Week button to view the sired result on the display
- WHILE IN THIS MODE Press the “C” or “F” button to toggle between Fahrenheit or Celsius display format.
Using Alarm
To Set Alarm Time
- Press ‘+’ or button to show the alarm time. Icon ‘ALARM TIME’ will be displayed.
- Further press ‘+’ or ‘-‘ button to change the alarm time. Holding ‘+’ or ‘-‘ button will make the setting scroll faster.
- Alarm time setting will be confirmed and it will jump back to normal time display mode if no key is pressed for about 5 seconds.
To Activate Alarm Function
- Slide the `SNZ/ALARM ON/OFF’ switch to the ON position, the sign Zz will appear. The alarm function is activated.
- When the alarm sounds, press the Snooze/Light button. The alarm will sound the same time of the next day.
- To deactivate the alarm function, slide the SNZ/ALARM ON/OFF switch to OFF position.
To Activate Snooze Function
- Slide the SNZ/ALARM ON/OFF switch to SNZ position. Both the sign and `Zz’ will appear. The snooze function is activated.
- When the alarm sounds, press the Snooze/Light button. The alarm will sound again in approximately 5 minutes.
- To deactivate the snooze alarm, slide the SNZ/ALARM ON/OFF switch to the OFF position.
Using the Backlight
You may check the time in the dark by simply pressing the SNOOZE/LIGHT button once. The display will light up with a soft glow that lasts for a while. You can read the time easily and clearly.
Note: Frequent use of this feature will affect battery life.
Check Temperature
The temperature is displayed in the temperature field, Hi and Lo will be shown if the temperature is out of the measurement range.
Re-set the unit (Troubleshooting)
Press the “Reset” button when the clock is displaying irrelevant time even when the “Wave OK” or “OK” shows on the LCD. This may happen when the external noise is severe enough to interfere with the time signal.
Care of Your Clock
- Avoid exposing your clock to extreme temperatures, water or severe shock.
- Avoid contact with any corrosive materials such as perfume, alcohol or cleaning agents.
- Do not subject the clock to excessive force, shock, dust, temperature or humidity. Any of these conditions may shorten the life of the clock.
- Do not tamper with any of the internal components of this clock. This will invalidate the warranty and may cause damage.
Recent Comments