Operating Instructions for Bulova Connect WIFI clocks.
Posted on December 13, 2019 | By clockde
Bulova Connect WIFI clocks
Features:
- Wireless WIFI connection
- Identifies the location and sets the accurate time, Based on Internet time servers anywhere in the world.
- User-friendly initial set up.
- Daily automatic time recalibration with internet time servers, Your clock will be accurate within 0.5 seconds every 24 hours.
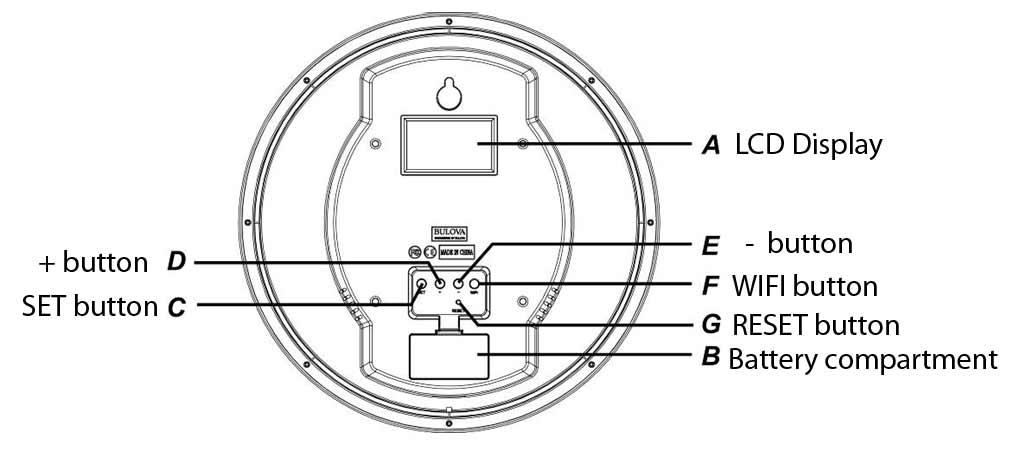
A: LCD display B: Battery compartment C: SET button D: + button E: – button F: WIFI button
G: RESET button
To Start the Clock
Remove the battery compartment cover. Insert two fresh, good quality alkaline “AA” size batteries into the battery compartment making sure the battery polarity is as indicated. Reassemble battery cover.
Be sure your router signal (WI-FI) is operating. You can confirm to see if your phone or computer is receiving your home WI FI signal.
Initial Wi-Fi Connection
- Press the RESET button with a paper clip or pen point. The hands will fast forward to 12 o’clock, i.e. the hour, minute and second hands move to 12:00 position. The display will show “Hands Reset”. This may take up to 5 minutes.
- During this period the LCD displays on the case back shows “Search WLAN” and then shows the list of available WiFi routers in the area.
- Use the “-“ button to move the highlight bar down to select your WiFi router. Once Highlighted then push the C – Set button to confirm the correct connection.
- To input the password of your router. Use “-“ button E (Moves down) and “+” button D (Moves left) to move the cursor to the letter / symbol. Press the SET C button to confirm the letter / symbol. If an error is made, Press the WIFI button (F) to delete the wrong input. When the correct password is shown on the display, press and hold SET button for more than 3 seconds to complete the password input.
- Once password input completed successfully, the LCD display shows “CHECK VERSION”, and then get the location (CITY) and time information from the correct internet server for your location.
- Once connected the LCD display (in the rear) will show the synchronized calendar / time / day of the week on the LCD display automatically.
- Within a few seconds, the LCD display will show “Hands Calibrate”. The hour and minute hands on the dial will move quickly forward automatically synchronizing the exact time.
To activate LCD Display
To save battery power, the LCD display on the back of the clock shuts off if idol for more than one minute. To activate the display, press any button (except the RESET button) for more than 3 seconds. The LCD display will turn on and show local time, Day and Date in a Military time (24 Hr.) digital format.
Changing to a different WIFI Server or a new WIFI password
- To wake up the display, press any button (except RESET button) for more than 3 seconds. LCD display will show the current time.
- Press and hold the WIFI button for more than 3 seconds, the LCD display shows “Search WLAN”.
- Follow steps #2 to step #7 under section of “Initial WIFI Connection” to select the correct WiFi router and follow the same steps for an updated connection.
To Set the Time on Dial Manually
If WIFI server is not available or the WIFI signal is weak, please setup the clock manually by following these steps. In this mode the clock will be not connected with WIFI server. The time will not be automatically adjusted for daylight saving time. Follow the steps below to setup the clock.
- Reinsert the
- Press on the RESET button with a paper clip or pen point. The hands will fast forward to 12 o’clock, i.e. the hour, minute and second hands move to 12:00 position. This may take up to 5 minutes.
- Press and hold the SET button for more than 3 seconds to enter manual setting mode.
- The sequence of setup procedures is Time zone / Year / Month / Date / Hour / Minute / Second / DST On or Off. Use “+” and “-“ button to select and “SET” button to confirm the setting.
- Once the setting is complete, the LCD display shows the time and day and the hands on the front of the clock will show the same time
Daily Automatic Synchronization
The clock will automatically update information from the Correct internet time server every day randomly between 3:00 am and 5:00 am.
Replacing the Batteries
- When the batteries require replacement, please replace both batteries at the same time.
- If the clock is currently connected to a current WIFI router before replacing the batteries, the clock will automatically reconnect with the same WIFI router. (no resetting required) Simply insert fresh good quality batteries into the battery compartment and use a paper clip or pen point to push the RESET button. Reestablishing the network connection will automatically be done. This may take up to 5 minutes to complete the process.
- If for any reason the clock fails to connect with WIFI server automatically, follow the steps on “Initial WIFI Connection” to set up the clock again.
Automatic Software Upgrade
This clock is enhanced with automatic software upgrades capability. To achieve the most updated software, please follow the steps on “Initial WIFI Connection” to reset the clock again. The clock will automatically download software through the connected WIFI server. The display will show messages of “Warning” “System Updating” “Don’t power off”. Do not remove the battery during the software update process is undergoing.
Recent Comments