Seiko QHR020WLH Instruction Manual

QHR020WLH INSTRUCTION MANUAL
PRECAUTIONS
Do not expose the clock to extreme temperatures, direct sunlight, water or severe shock. Avoid contact with any corrosive materials such as perfume, alcohol or cleaning agents. Do not subject the clock to excessive force, shock dust, temperature or humidity. Any of these conditions may shorten the life of the clock. Do not tamper with any of the intemal components of the clock. This will invalidate the warranty and may cause damage.
BATTERY
Battery life: Approx. 1 year.
When the LCD becomes dim, replace with 2 pieces of new AA size battery at once. Use only fresh batteries. Mixing old and new batteries may cause battery leakage.
SEIKO RADIO CONTROLLED "R-WAVE" clocks are extremely accurate due to their ability to receive radio signals from the most accurate clock in the world, the cesium atomic clock maintained by the National Institute of Standards in Fort Collins, Colorado. This atomic clock is so accurate it keeps time to within one second in one million years. Seiko R-Wave clocks also automatically adjust for daylight savings time.
R-WAVE ZONES
Continental United States, parts of Southern Canada and Northern Mexico. Geographic features, weather disturbances and structural characteristics may affect reception. Signal reception is strongest during night time.
LOCATION OF THE CLOCK
Place the clock near a window and in an area in your home or officewhere you receive good radio reception.
Avoid placing the clock near electrical devices such as personal computers, radios, TV's, satellite dishes, air conditioners, etc. Also, avoid light dimmer switches and appliances with electric motors such as dishwashers, refrigerators and washing machines. These devices may interfere with the reception of the signal.
FEATURES
Calendar with day-of-the-week in five languages from January 1, 2000 to December 31, 2050
Automatic Daylight Savings Time
Alarm with snooze function
Thermometer with selectable °C/F format
Hygrometer
TO START THE CLOCK
Slide the battery hatch on the back of the clock and insert 2 "AA" batteries following the (+) and (-) polarity diagram.
NOTE: Remove the clear film label over the LCD panel before theclock is used.
SELECTING THE APPROPRIATE TIME ZONE
To set the appropriate time zone, press the "MODE" button to enter the Alarm Setting Mode.
Press the "SET" button to change the time zone. P=Pacific M=Mountain C=Central E=Eastern
Press the "MODE" button to save and exit the setting mode.
AUTOMATIC TIME SETTING
First reception after power-up
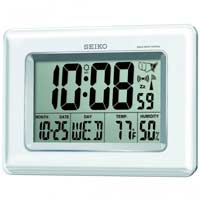
The clock will search for the signal automatically after powered on. The tower and wave icon at the right position of the display will start flashing to indicate the receiving status.
If time signal is received, synchronization will take 6-12 minutes and the clock will show the received time. Successful reception is indicated by the 3 solid waves of the tower and wave icon.
Manual time update
Reception can be started any time by press and holding the "C/F RECEIVE" button.
NOTE: Frequent use of this feature will affect battery life.
When there is radio frequency interference, the clock may be unable to obtain communication link and can only return to the normal condition when the interference stops.
STANDARD TIME / DAYLIGHT SAVINGS TIME
The clock will change to the standard time / daylight savings time automatically when the time signal is received. The display will show 'DST' during the summer. POOR RECEPTION
If for some reason your clock does not set itself automatically within 24 hours, it is probably due to poor reception. This is normally a temporary condition. Try another location in the room or move to another room. If possible, locate the clock near a window. If you would like to set the clock manually while waiting for the automatic time setting, follow the manual setting instructions.
NON-RADIO OPERATION
If you live in an area where the signal is not received (Alaska, Hawaii, etc) you can still use your clock as a non-radio controlled clock by following the manual setting instructions.
MANUAL SETTING INSTRUCTIONS
Press and hold "SET" button for 2 seconds until the hour digit flashes.
Press "ADJUST" button to change the value of the hour digit.
Press and hold "ADJUST" button to increase quickly.
Press the "SET" button once, the minute digits will flash.
Press "ADJUST" button to change the minute value.
Press the "SET" button once, the second digits will flash.
Press "ADJUST" button to set the second value to O.
Press the "SET" button, "12H" or "24H" will flash.
Press "ADJUST" button to switch the time format.
Press the "SET" button once, the month digits will flash.
Press "ADJUST" button to set the month.
Press the "SET" button once, the date digits will flash.
Press "ADJUST" button to set date. The weekday will synchronize with the date automatically.
Press the "SET" button once, the year digits will flash.
Press "ADJUST" button to change the year value.
Press the "SET" button once, the date digits will flash.
Press "ADJUST" button to choose from 5 languages weekday settings.
The 5 languages weekday settings are represented by the below
abbreviations:
GB=English FR=French DE=German
ES=Spanish IT=ltalian
After setting, press the "MODE" button once to end the setting.
SETTING THE ALARM
In the Normal Time Display, press "MODE" button to enter the Alarm Setting Mode.
Hold the "SET" button for 2 seconds until the hour digit flashes.
Press "ADJUST" button to change the hour value of the alarm time.
Press "SET" button again, the minute digits will flash.
Press "ADJUST" button to change the minute value of the alarm time.
Press "MODE" button to exit the setting mode.
NOTE: The alarm will be automatically activated after setting the alarm time.
USING THE ALARM AND SNOOZE FUNCTION
Set the alarm time as described in the previous section. In Alarm Setting Mode, activate the alarm by pressing the "ADJUST" button so that the alarm icon" ((,.,)) " appears.
Activate the snooze function by pressing the "ADJUST" button twice so that the snooze icon "Zz" appears.
To de-activate the alarm and snooze, press the "ADJUST" button until both icons disappear.
NOTE:
When the snooze function is activated, the alarm will ring for 5 times in 4-minute intervals. The alarm duration is 60 seconds. The "Zz" icon will keep flashing during the whole alarm and snooze period. Pressing any button will temporarily stop the alarm. To stop the alarm function completely, de-activate the alarm as described in the previous section.
When the snooze function is not activated, pressing any button will stop the alarm completely. The alarm will ring again 24 hours later.
TO TOGGLE BETWEEN DATE/MONTH AND YEAR DISPLAY
Press the "ADJUST" button in Normal Time Display to toggle between DATE/MONTH and YEAR display.
TO TOGGLE BETWEEN °C / OF
• Press °C / OF button once to toggle between °C and OF formal.
USING THE WALL-MOUNTED FUNCTION
The clock has both desktop and wall-mounting structure. You can place it on the desktop by its stand or hang it on the wall by its recessed hole.


 We promise to
provide quality products and the best service possible. If you have a question about
any product we carry, please call us at 1-866-402-8714 M - F 10:00 - 6:00 EST., Sat 10:00 - 3:00


